Handbrake is a powerful video transcoding program than is greatly misunderstood. A lot of discussion goes into which preset to use for the best quality and fastest encode times. However, Handbrake’s presets are designed for best compatibility of devices regardless of quality. If you are planning to playback on VLC or Roku Media Player not to much to worry about in terms of comparability. However, if you have an Apple TV or a Bluray Player look at the support guide. The presets are basically useless and will lead to worse encode times when stringent format support is not required.
When encoding for home consumption your looking for
- Smallest File
- Quickest Encode Time
- Highest Quality
A lot of people after watching youtube videos think GPU encoding is perfect for this job, you would be wrong. Here are the issues with GPU encoding is that GPUs are geared towards live encoding for game streaming. The reason they can get these incredible encode time is they are doing a lot less optimized encoding. How video encoding gets great compression is by finding similarity between frames or reducing quality. Finding similarity between frames means you have to look at more frames before outputting a frame. Looking at more frames increases latency thus why it is generally avoided in GPU encoding as it has worse compression. Below I have video by YouTube Maraksot78 about compare file with different encoders. Intel quick sync encoding H.265 provided the smallest file of any of the hardware accelerated systems it still was 40% larger than the CPU encoded file and 1.6 times faster encode time.
Also, an annoying thing about handbrake is that custom presets are compatible across operating system or version. Which means you’re going to have remake them every time which is very annoying.
Here is what you need to compress video
First quick way to reduce encode time
- Copy content to internal drive if you have enough space. This way reading the file does not slow down encode time
- Make sure your using fast external storage (use a usb 3.0 drive or better yet an external drive enclosure)
- Use MediaInfo to learn more about the data you want to encode
Step 1 Learn more about your content
Is the video you want to encoded a rip from a Video Disc (DVD or Bluray or Maybe an HD DVD?)
Is the video progressive or Interlaced?
What format is it encoded in? as you may not get additional compression
Here are some examples from MediaInfo using the tree view
Example 1: A video from my digital camera
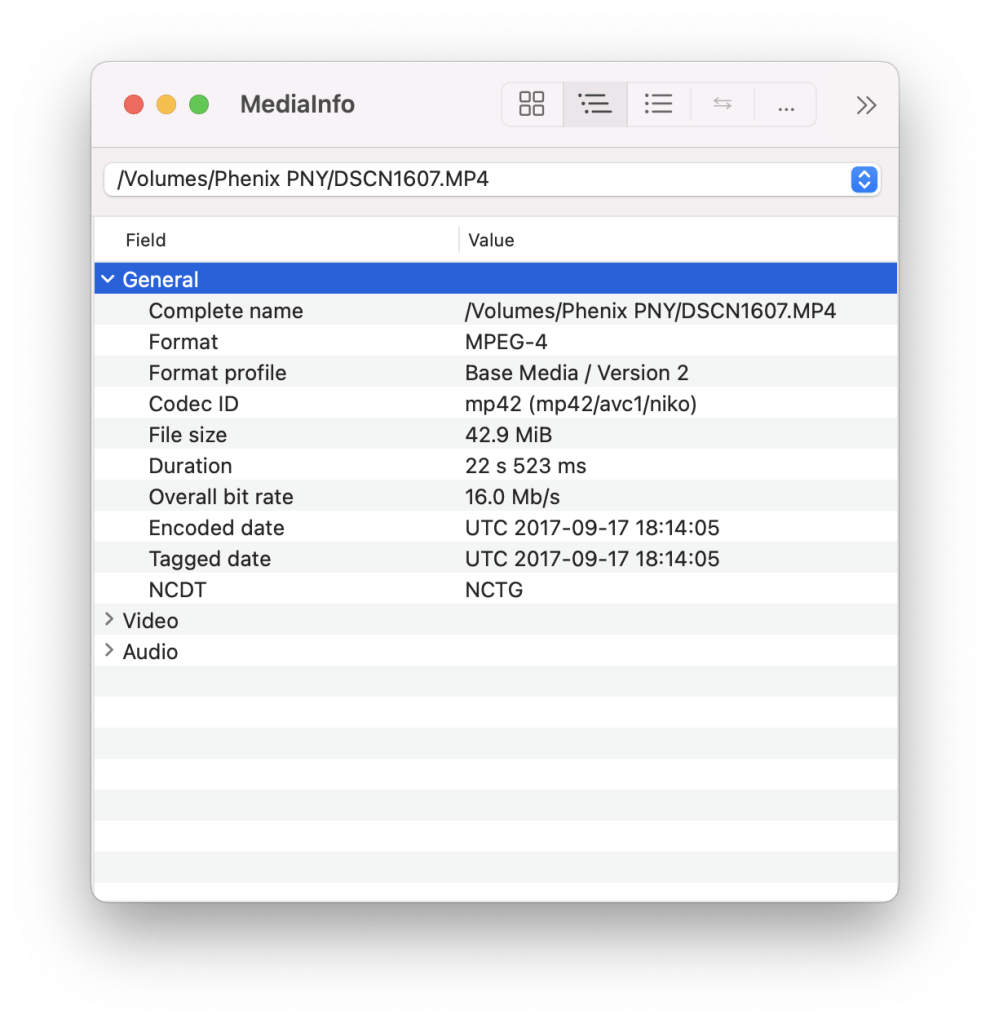
Here are the fields to pay attention to Complete name this is the name and location of the file. The format field tells you the container that is used to storage the video file. A container is basically like when you store a bunch different documents in a zip file so they are linked together. A container is always used because inside a video file is literally a separate audio, video and subtitle files. A container also limits what type of files maybe stored inside of it. The field format profile tells you what video profile your movie in this affect things like maximum quality that can be stored.
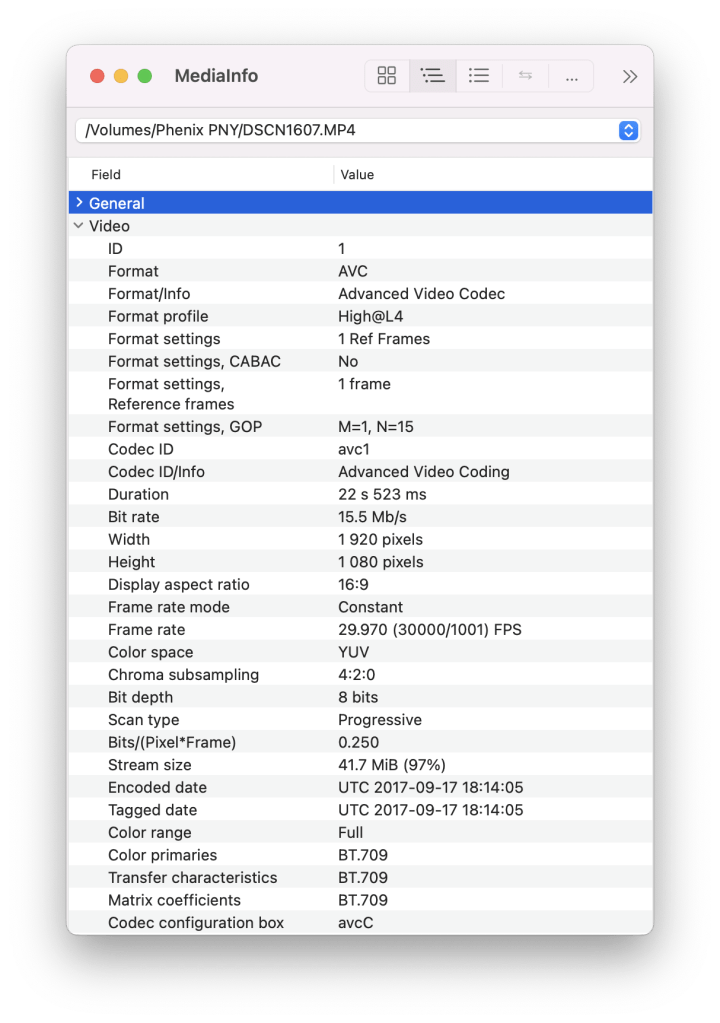
Now we will look at the video section. The fields you care are format, format info and Scan type. The format field tells you what codec this video is encoded in it currently encoded in AVC which stand for Advanced Video Codec as stated by the format info. AVC is also known as H.264 which is the name of the ITU standard for the video format. Then finally the Scan type field tell you if this progressively scan like modern display or interlaced. Knowing the scan type can help save encode time and do necessary processing.
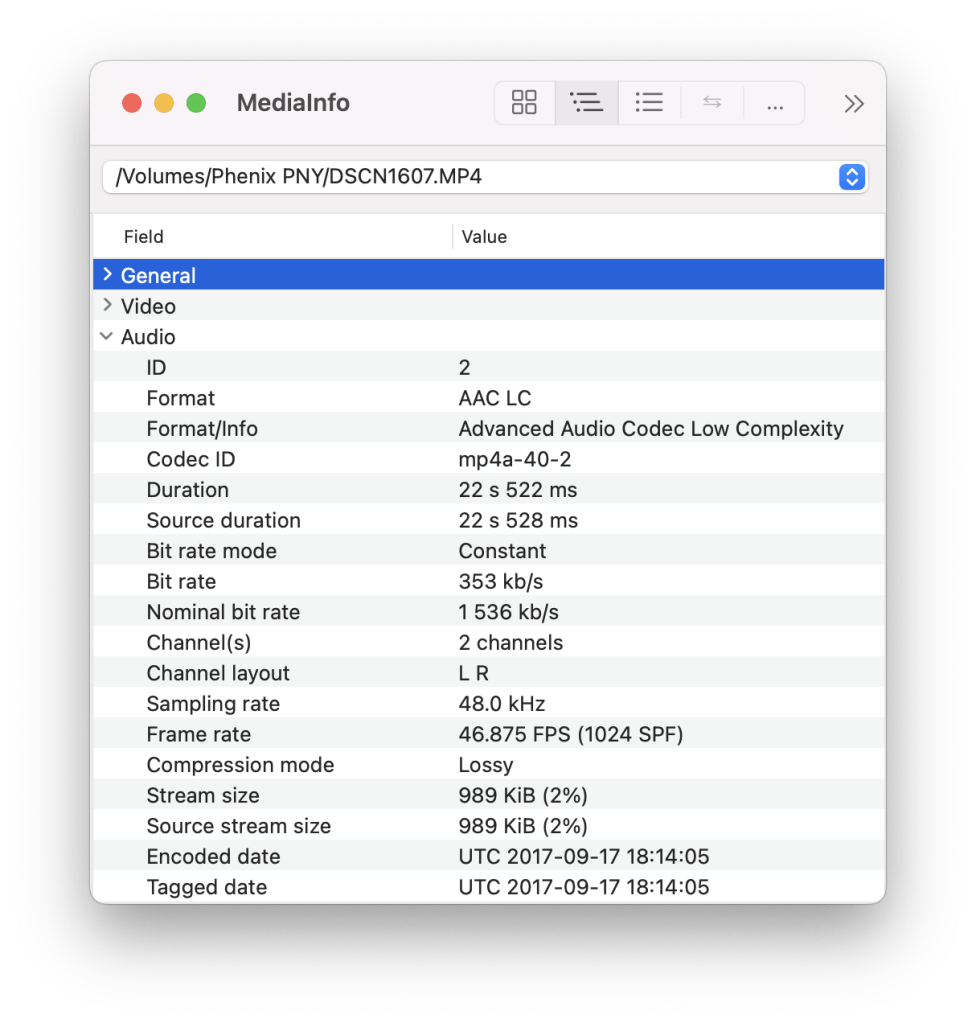
Now finally onto the audio field. The fields of interest are Format, channel(s) and Compression mode. The format tells you what audio format is stored in. When encoding you never want to modify this format because increase computation and can hurt audio quality or even convert 5.1 to surround sound. Many will say you should convert it to save space but in the case of this file the audio only accounts for 2% of the total file size so your no saving anything.
Example 2 A rip of DVD movie

Notice that we have additional field in this such as text and menu along with additional audio fields. This has multiple audio tracks in this case English and Chinese. The text fields contain subtitles and the menu contains the DVD chapters.

So big difference is that the format field is Matroska. This is a MKV file and my preferred containers it allows a lot more file types to be stored and is an open format.
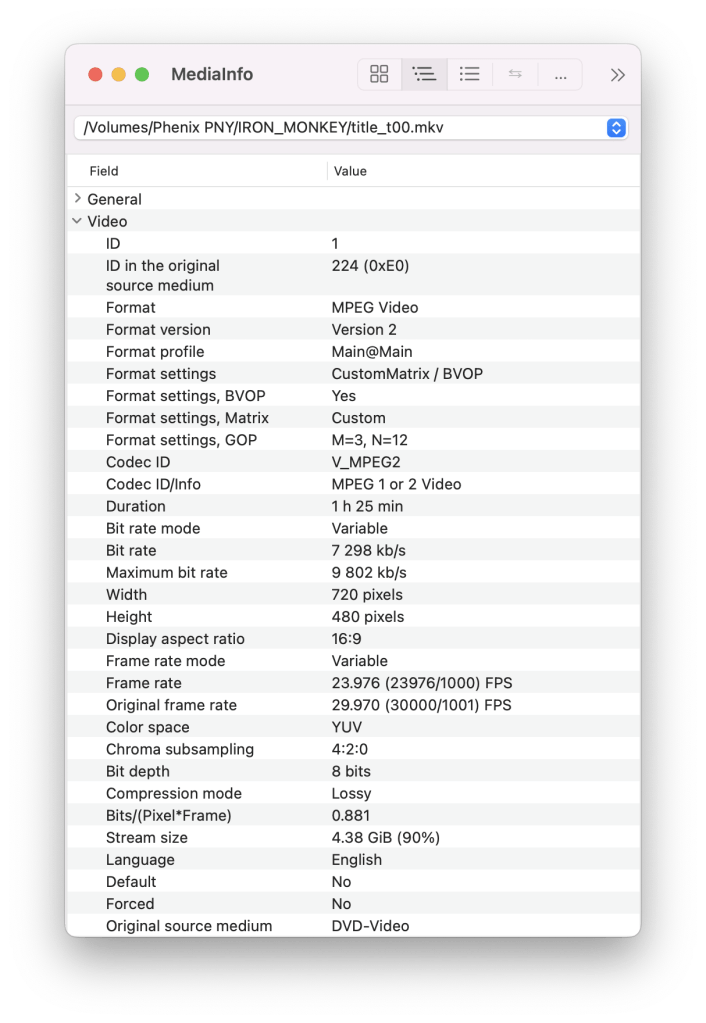
The fields are format, format version, frame rate and original frame rate. The format and format version tell you that this is encoded in MPEG-2 this is a very common format on DVD. The very important field is frame rate and original frame rate. DVDs can only store video at frame rates of 25 or 29.97 (this is known as 30 fps broadcast but it is not really 30fps because of reason that are beyond the scope of this article look up NTSC or watch the playlist by Technology Connections. But in short summary when your encoding video you need to set the frame rate to the frame rate field ,but handbrake will show the frame rate as Original Frame rate field.
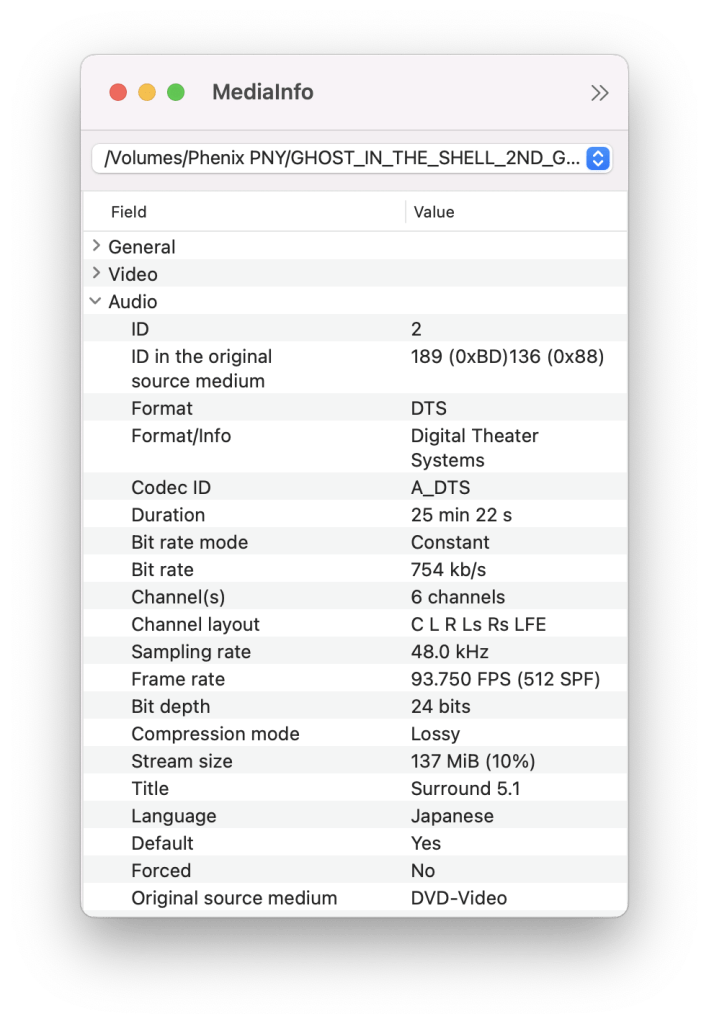
The big difference is that this has surround sound with its six channels. The format is is AC-3 which has the commercial name of Dolby Digital. Look the field language this is the english track ,but Audio #2 is the Chinese track.
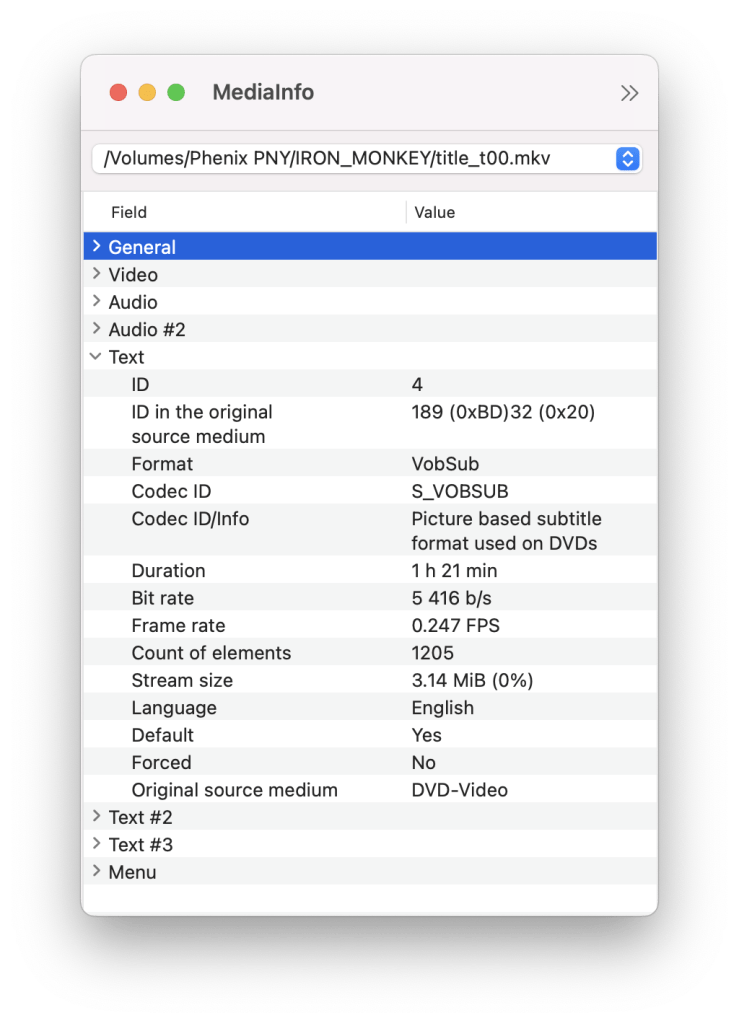
I am showing it for information consistency but you will not have to do much with it in handbrake.
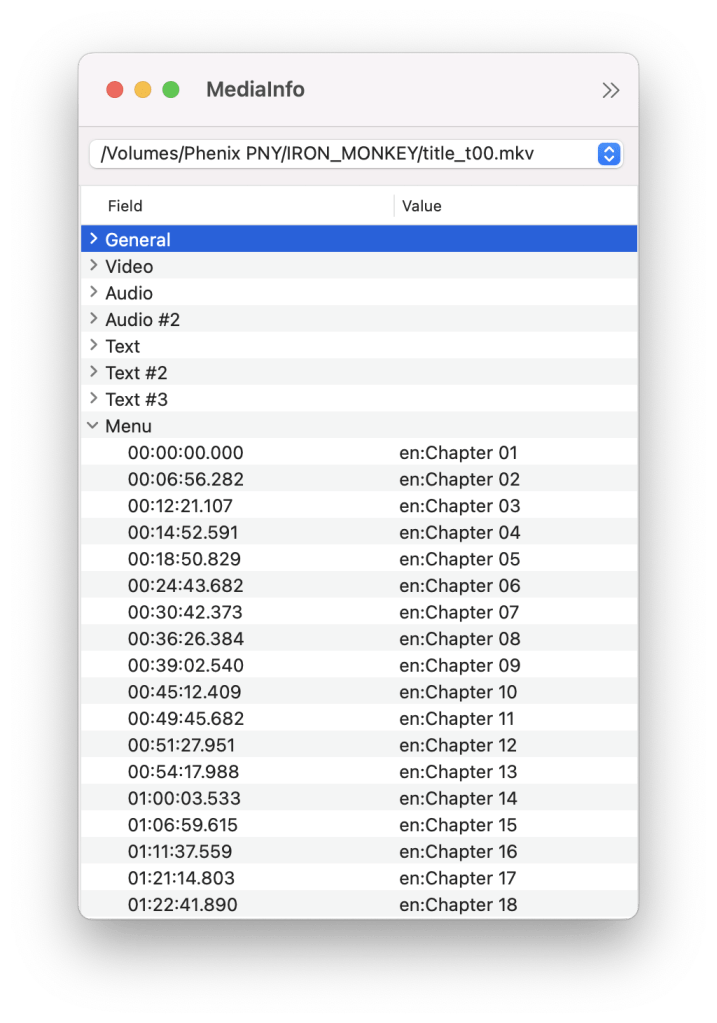
This allow you to use scene selection.
Example 3 interlaced DVD

Here is the important fields to look out for is scan type, scan order and Standard. The scan type field shows that this video file is interlaced and that the first field is at the top of the screen. Film Maker IQ has a great video (The Joys and Sorrows of Interlacing) explaining what interlaced vs progressive video. However because this interlaced it will need to be de-interlaced to properly be displayed on modern display. The Standard will tell you what standard you need to set it and guess at the true framerate.
Here this is just to point out that DTS surround audio exist.
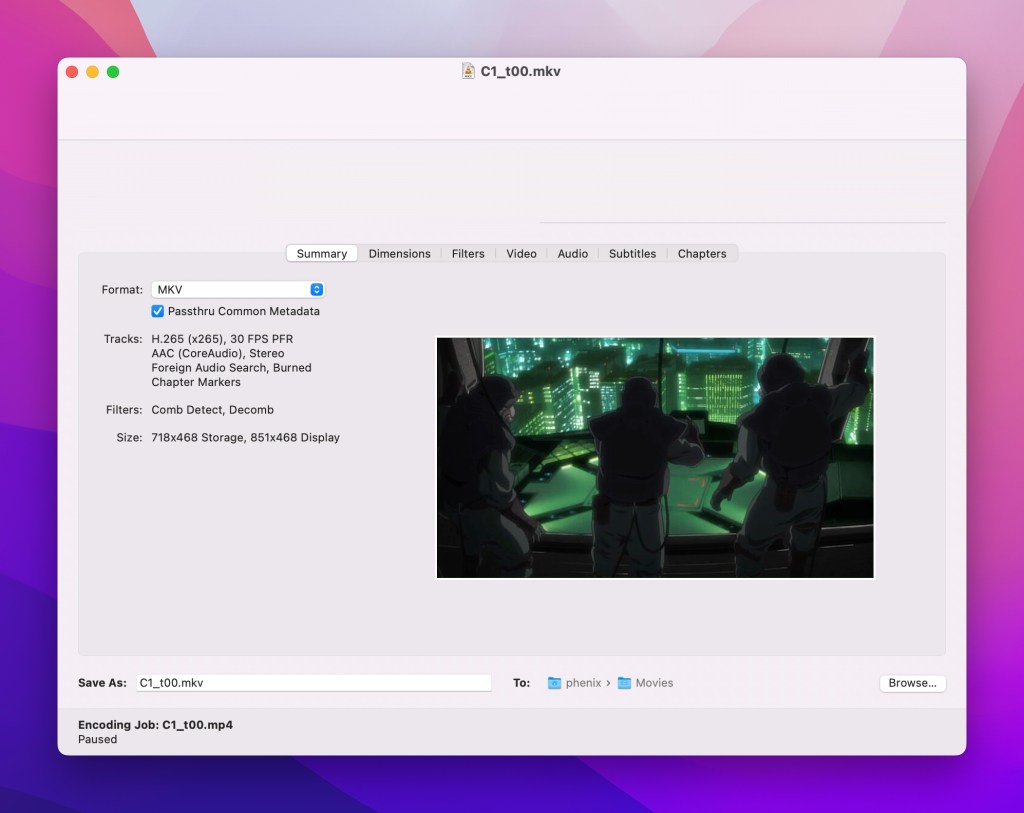
Now onto handbrake Settings. The goal is to show you how to encode a HEVC/H265 file passing thru all audio and subtitles into an MKV container.
Picture Top menu
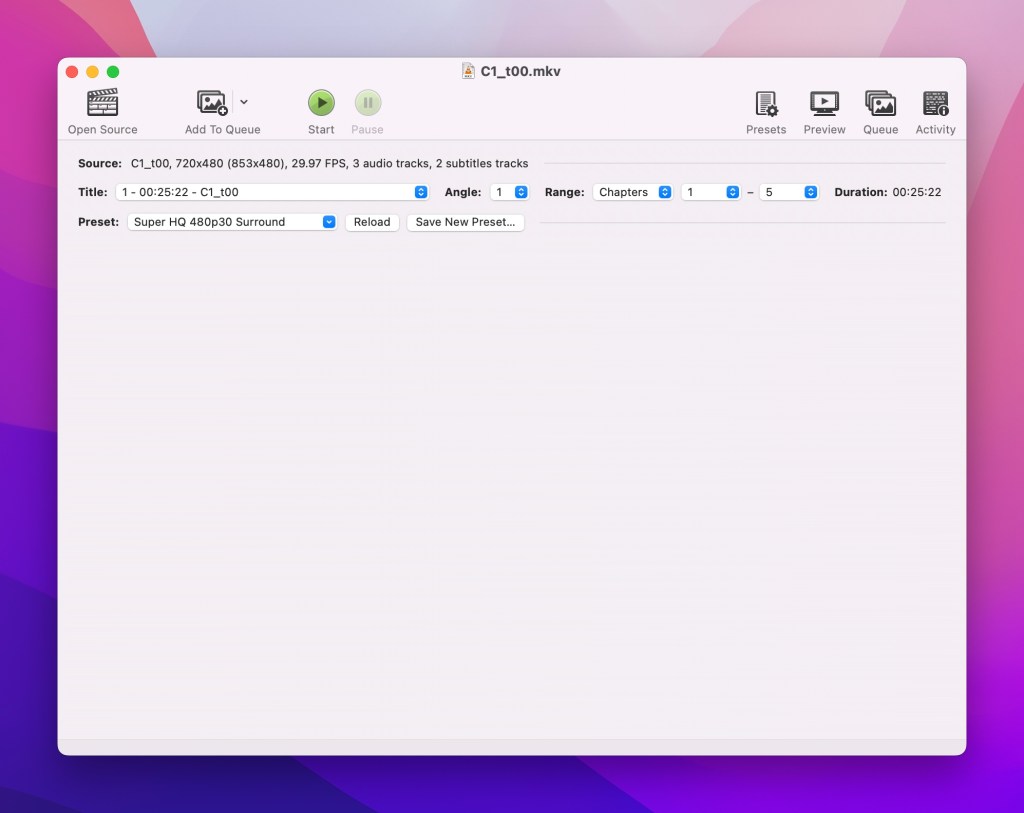
Here is how we break Down the top menu
Open Source – This is what you click to open a video or folder of videos you want to encode
Add to Queue – If you imported a folder of videos this allows you to setup the same transcoding for all video in the imported folder. This allows you to set a bunch of settings on one video and apply it to all videos.
Start – will start the encoding of videos
Pause – pause allows you to pause encoding when you need more CPU powerful
Presets – Shows you list of available presets. If you are trying to encode for specific device this can be useful ,but they will not be used in this tutorial.
Preview – this allows you to preview your video encoding setting this very useful and can save you a lot of time compared to just rendering out a whole a video. This will also allow you to estimate how long an encode will take.
Queue – Allows you to see video that are in the encode queue and this opens up a new window
Activity – handbrake is basically a wrapper for a command line program and this just a cleaned up version of the command line output. Can be helpful for figure additional stats about encoding speed but generally you will will not need to interact with it.
Source – is the current video file that you are working on.
Angle – would allow you to selection another camera view if you have a file with multiple video streams
Range – allows you to select the region of the title you would like to encode. The selection range can be anything from chapters, seconds or frames
Preset – is the currently selected preset
Summary pane
This pane summarizes the encode settings
save as – controls the output file name
encode time – would tell you the progress of an ongoing encode
Dimensions Pane

Basically set for the bare minimum any cropping on downscaling will cause additional computation.
Orientation & Cropping
Unless the video has clear visible black bar around the edges you want everything in Orientation & Cropping off. Flipping should be unselected, Rotation should be at zero and cropping should be set to none. If your platform does not have a none option then should set it to custom and put zero in all the boxes.
Resolution & Scaling
Resolution Limit – None. This will allow you to reuse this as a template.
Anamorphic – Automatic
Optimal Size – Leave Checked
Allow Upscaling – leave unchecked. If checked this will drastically increase computation time depending on what your resolution limit is set to.
Borders
fill -none. You do not want to add a border to your video
Final dimensions
can be ignored let handbrake do it for you.
Filters Pane
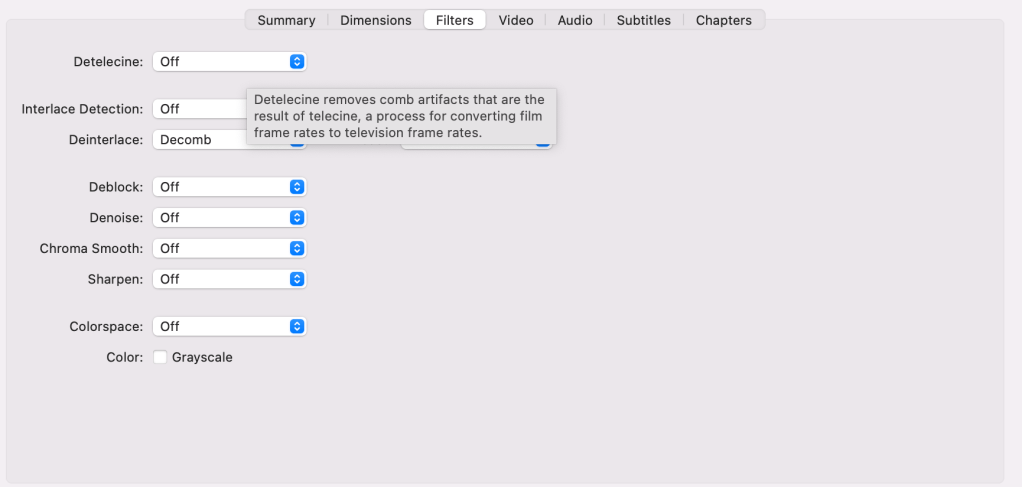
Anything in this pane will be done with CPU and increase encode time
I mention the setting Detelecine (link wikipedia article). What happen is this processing is about undoing the process to turn convert film to television frame rate called telecine. Converting Cinema (shot on film) frame rate (24fps) to television frame rates 25 fps and 29.97 fps involves some interesting process but when converting to a progressive frame rate we want it to be at its original frame rate. Animated content is almost always rendered at 24fps because it is cheaper to do it this way. for reference for you save 60 frames every minutes when you compared to 25fps. You save 358 frames per minute compared to 29.97 fps. If you assume a film is approximately 90 minutes long that mean at 24fps saves you 32238 frames compared to rendering at 29.97fps and 5400 frames compared to 25 fps. In other terms renders in 29.97 compared to 24fps is like making your movie 22 minutes longer and almost 4 minutes longer at 25 fps. So assume it is at 24fps if it is animated or your regions equivalent.
If your content is progressive or the scan type is not provided then you want to set every filter to off. Playing with these filters will not really improve your encoding with out massive amounts of tweaking and then only marginally. If your frame rate differs original frame rate and is 24 fps or 23.97 or 23.976 enable the Detelecine this will help improve the quality of motion.
If your content is interlaced only turn on Interlace detection to default then set Decomb and choice the preset EEDI2 this will give you the best Deinterlace quality. If you know the content original came from film or is animated turn Detelecine to default.
Video Tab

Video Encoder – H.265 (x265) x265 that will encode your video
Frame Rate – the simplest and the least computational expensive option is same as source. However, if you video was originally from film set the frame rate to the appropriate frame rate for your region.
Make sure your have handbrake set to variable frame rate this means that only when a change on the screen this can drastically decrease your file size if you have a lot of static content. Make sure your quality is set to Constant Quality this will give you the best looking output by varying how large each frame needs to be to have maximum quality. HandBrake provide suggested values in the document “Adjusting Quality”. The smaller number the value the better the quality but do not go 2 less than suggested as this will just increase file size without really improving quality. Remember zero just render a whole saves each frame as an uncompressed image and reduce file size is about only storing the difference between frame.
Preset – set this to faster. A lot of people believe that this a quality setting including the handbrake team. It is not a quality setting but a compression vs quality. Basically increasing from faster to fast might reduce your file size, but it will definitely increase your encode time and remember since you are using constant quality encoding it will just increase the file size in specific regions to maintain quality so I would really only go from faster, medium & slow. I have not noticed visual quality drops or drastically bigger files using faster but have noticed the speed up in encode time. I have noticed quality drops using anything below faster.
Tune – If it was originally shot on film set to grain and if it is animated content set to animated. Otherwise set to none. This will also help reduce file size.
Profile – auto. Only the main and main still pictures exist so no reason to set it to anything other than auto.
Level – set to auto. (I am not even going to try to explain this. If your player says it only supports a specific level in h.265 set it to that level otherwise just leave it at auto)
Here is a link to the documentation for x265 the encoder used by handbrake to encode the files this better explains tunes and profile. You can learn a lot by reading this document it is very well written actually. A wikipedia page about the different types of frames used in encoding will help explain things like b-frames.
Audio
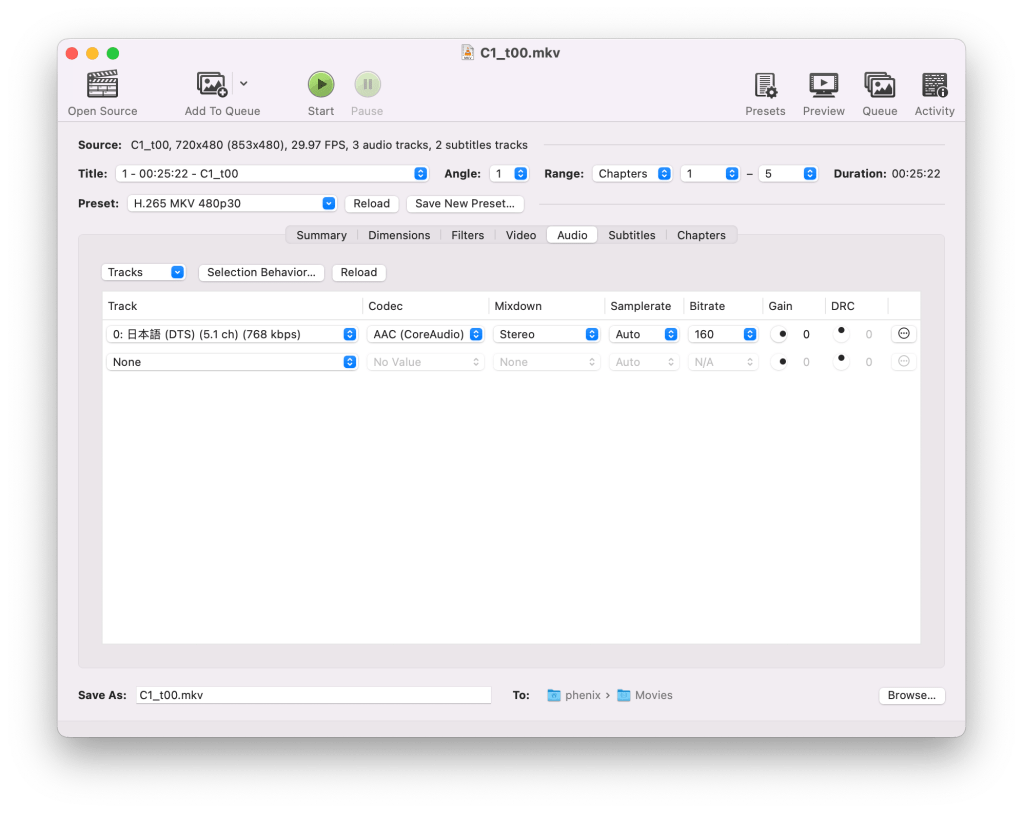
So here I am gonna to tell you to basically throw away everything that is already enabled away.
Click the button “Selection Behavior”
in the new window
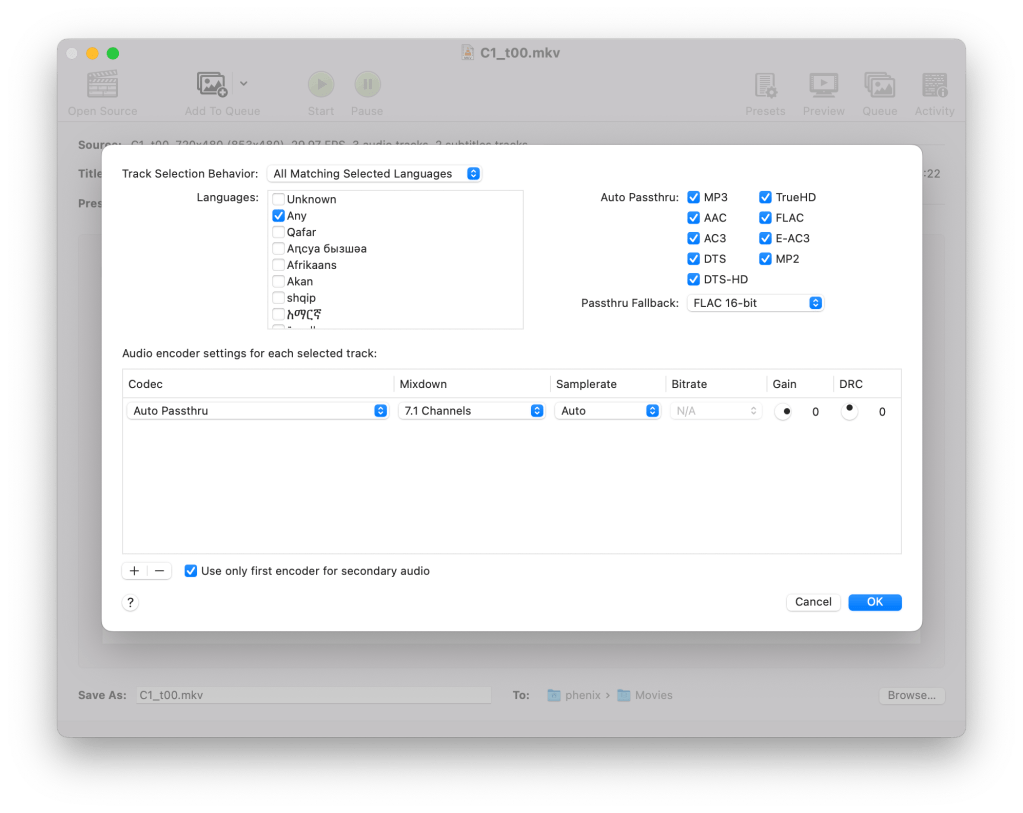
in the new window
Track Selection Behavior – All Matching Selected Languages
Languages – Any. Or your preferred language. Since audio takes so little space compared to video no reason to really not keep all the tracks. Then the person who prefers subs is always comfortable.
Auto Passthru – Select all of the check boxes you do not want to waste cycles re-encoding anything. Then set Passthru fallback as Flac 16-bit so you preserve the maximum quality audio in a lossless format. In most cases it will not do anything but pass the audio.
Then click the minus button at the bottom and make sure the pane is completely empty.
Then add the following
Codec – Auto Passthru
Mixdown – 7.1
Samplerate – Auto
Bitrate – cannot be set as this is passed from the file itself
gain – 0
DRC – 0
NOW click ok.
In the Audio Pane click reload
(if you do not reload you will not pass thru all the changes.)
This will load every audio track including stereo files of the selected language because by selecting mix down 7.1 it will never actually mix down audio.
Subtitles Pane

then click selection behavior
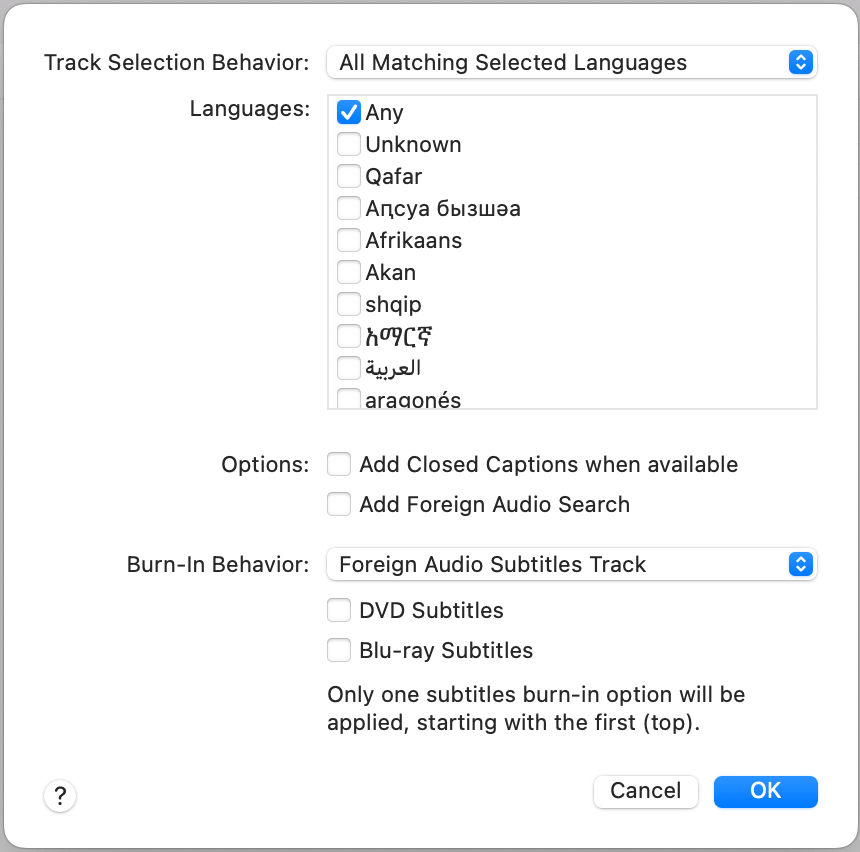
Track Selection Behavior – All Matching Selected Languages
Languages – Any
Options – Add Closed Caption when available select this option. Add foreign audio search.
Burn-in Behavior – None and deselect DVD & Blu-ray subtitles.
Click OK
Then hit reload in the subtitle pane.
Now all the subtitles are added. Once again these are text files do not add much to the final output.
Chapter Pane

If you know or want to name the chapters you can in this pane.
Create New Preset

Click New preset
Resolution Limit – None
Audio – Repeat the selection from the audio pane it does not pull that from your current settings which is annoying.
Subtitles – Repeat the selection from the subtitle pane.
Now that you are done you will want to save a preset for different qualities based on resolution and maybe even different tunes.
Why I do not like handbrake’s presets
In general the presets basically never use H265 which will give you the maximum compression possible without loss in quality. Only streaming services and website do not use H265 because they do not want to have to pay a licensing fee, but as an end user who has devices that support the format it saves you a ton of space. Yes, the encode time is longer, but I have found with the faster preset my H265 files are shrunk by a 1/3 on average (big variance can occur depending on the source material) without visual drop in quality just by going to H265. You can fiddle with the knobs of h264 all you want your not gonna get that drop in file size. Many presets forces a frame rate which could cause you to have to waste time generate additional frames or lose frames.
Should you even do this?
A lot of YouTuber are pushing services like Plex and Jellyfin and show these encoding tutorials. However, the issue with home media servers is that ripping DVD and Blurays then transcoding video takes longer than watching the films themselves. A NAS and Libredrive compatible Bluray drive is going to cost more than just buying a nice Bluray player. Also, in getting an optimal video deinterlacing and upscaling in most cases you just need to pop in a disc into a Bluray/DVD Player. You can buy a 4k capable Bluray player for between $150-1000 which will get you some of the best Bluray player in the world. The cheapest two drive NAS that I could find was around $160 with no storage drives which means for a lower end Bluray player (which the Sony ones are actually quite good) you could be watching a bluray instead of ripping them. So, unless you have videos that raw video files or video downloads it is more worthwhile for you time and money to just play your disc on a player. You can read my article about optical storage media ,but it has a much longer life than common wisdom states. Optical media has already out lasted the other storage media at this time so backing up to SSD or hard drives is a waste of time.

Leave a comment